Building Tips
The Skeleton Under the Slab: Grade Beams and Footings
Before a single wall goes up, the foundation gets a skeleton. Under the flat slab you eventually walk on is a web of concrete beams and footings, laced with steel and poured in one continuous shot. On this house the footings, the grade beams, and the slab are all cast at the same time - one monolithic pour, no seams. That makes the steel skeleton the most important thing on the job, because once the concrete is in, none of it can change. Here is how we lay it out, dig it, and build the cage that ties the house to the ground.
1. One Pour, One Skeleton
A monolithic foundation casts the footings, grade beams, and slab as a single piece - that is its whole advantage and its whole risk. When fresh concrete is placed against concrete that has already set, you get a cold joint: a weak seam where the two pours never truly bond. Pour it all at once and there are no seams. The foundation cures as one mass and moves as one piece, so when wind or an earthquake pushes on the house, the load runs through an unbroken path instead of stopping at a weak plane.
The trade-off is that everything has to be right before the truck shows up - the forms, the full steel cage, and every embedment, all signed off by the inspector. There is no fixing it once the concrete is in. One pour, no do-overs.
2. Footing, Grade Beam, Tie Beam
Three concrete members do three different jobs, and they get mixed up constantly. A footing is a snowshoe for the house. Stand on soft ground in boots and you sink; strap on snowshoes and the same weight spreads over enough area to stay on top. A footing widens at the bottom so a column or a wall spreads its load over enough soil that the dirt is not overstressed. The heavier the load above, the wider and deeper the footing below.
A grade beam does not push load straight down - it spans. It is a concrete beam at grade that bridges across ground we do not fully trust, carrying the wall between solid bearing points and resisting the bending the whole way. That is why it is reinforced like a beam, with heavy steel running along both the top and the bottom.
A tie beam holds pieces together. It links the footings so none of them can drift or settle on its own - which matters in a seismic zone, where we want the whole foundation moving as one unit instead of in pieces. On a real foundation these blur into each other, and one continuous pour can be footing, grade beam, and tie all at once. The three jobs are always there: bear down, span across, tie together.
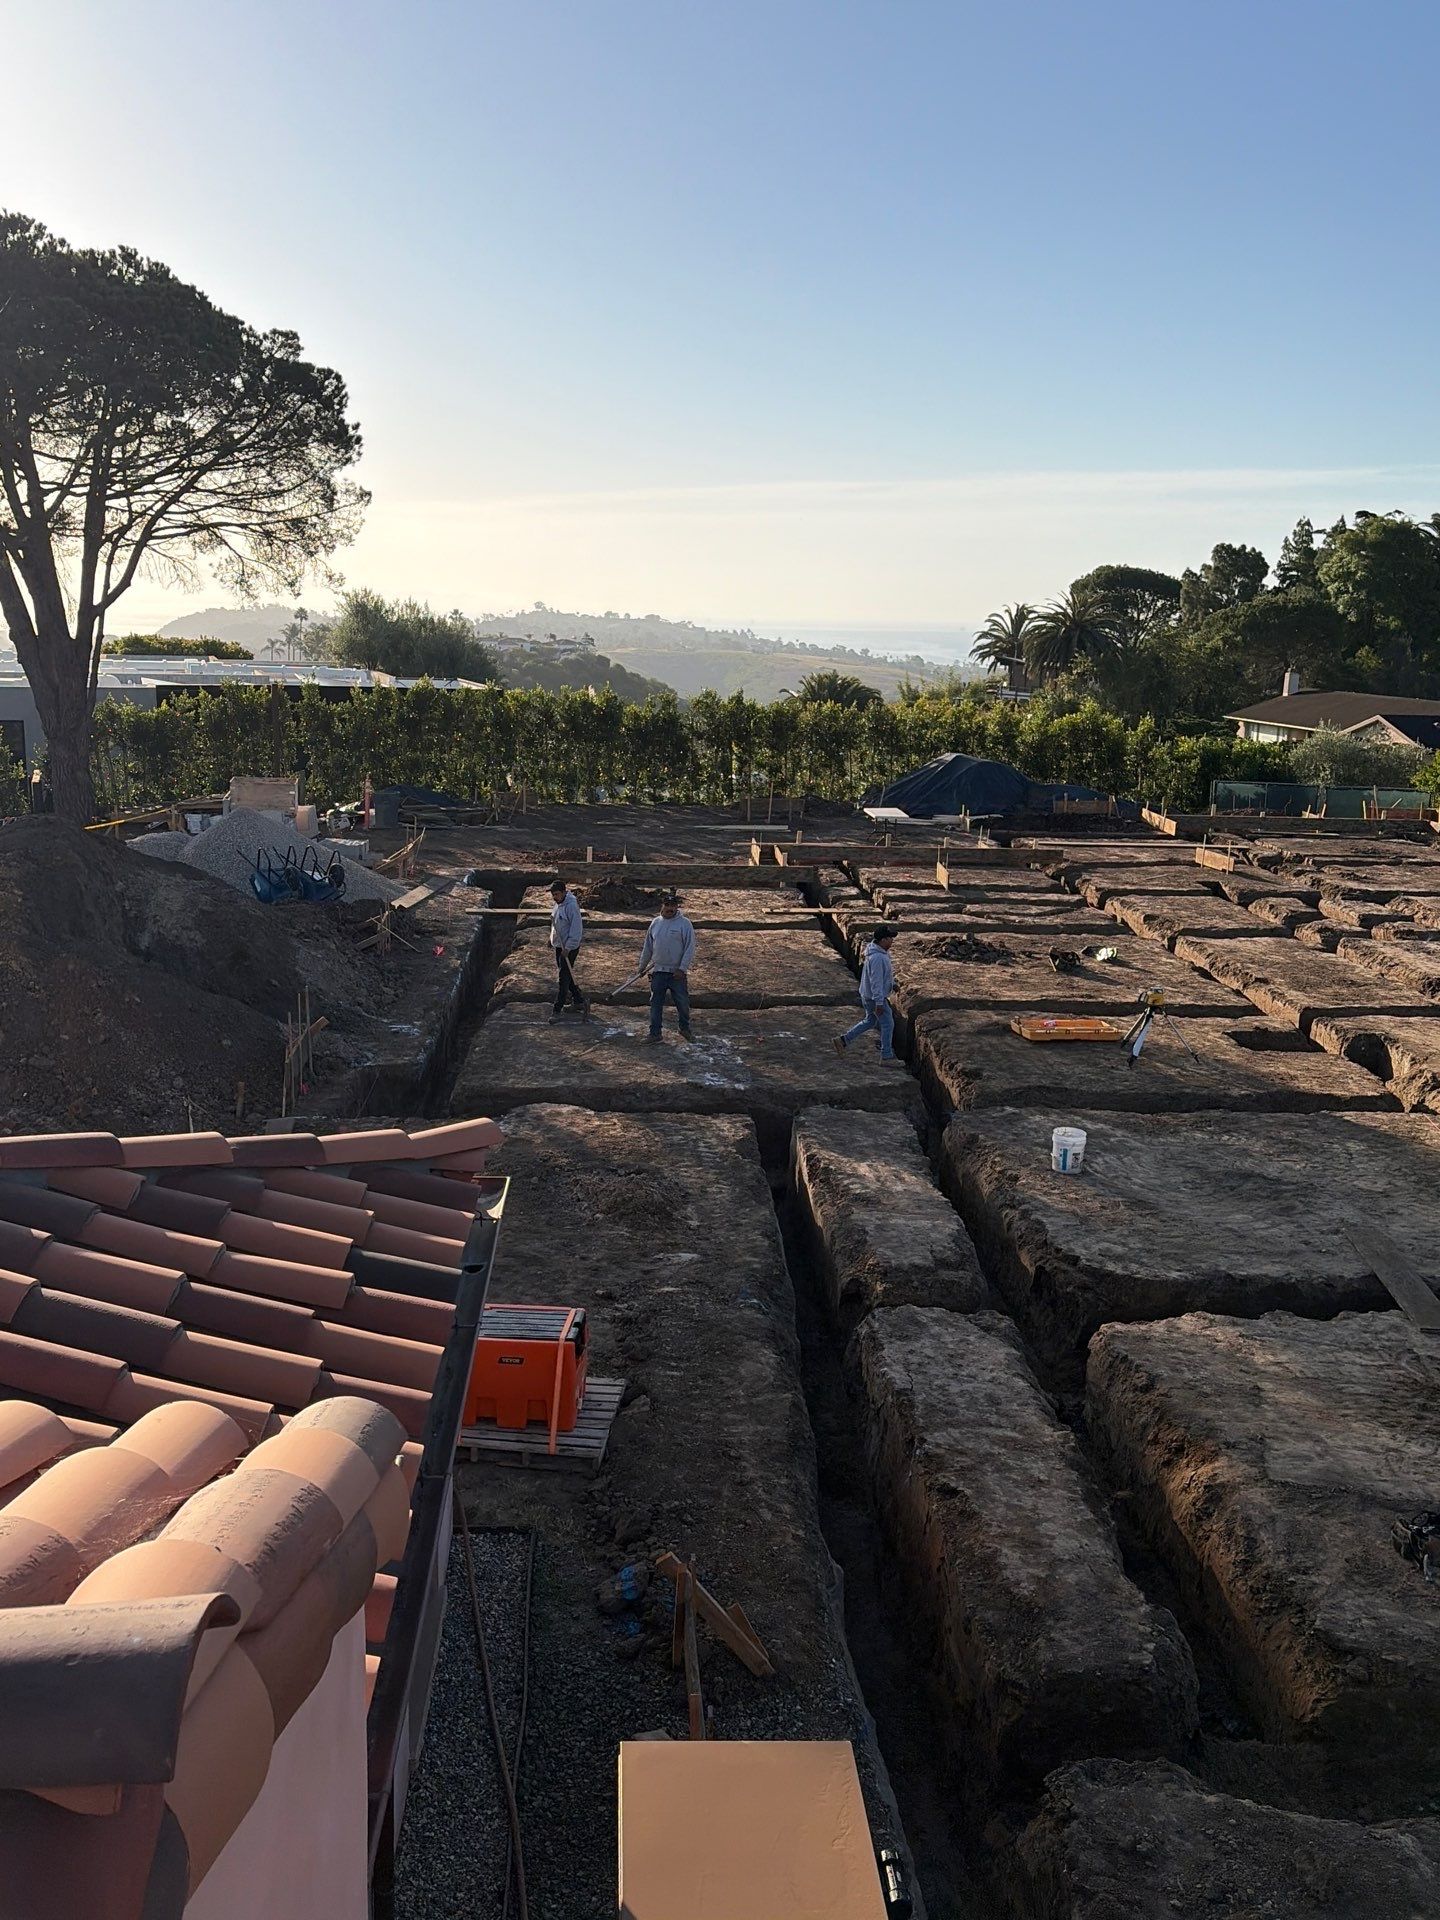
3. Layout: Chalk, String, and Laser
Before anything gets dug, the whole foundation gets drawn on the ground - and checked twice. Each day of excavation starts by re-establishing the chalk lines, then dropping a laser in a central spot so we can confirm the exact depth of every footing and grade beam as the machine digs. Grid lines get pulled in string a second time after the first cut, so we can cross-check the width of each footing against the number called out in the structural detail. Blue darts mark the critical end points of the layout so we can re-run string and re-chalk in minutes if a line gets knocked out. The plan goes on the dirt first.
4. Digging to the Detail
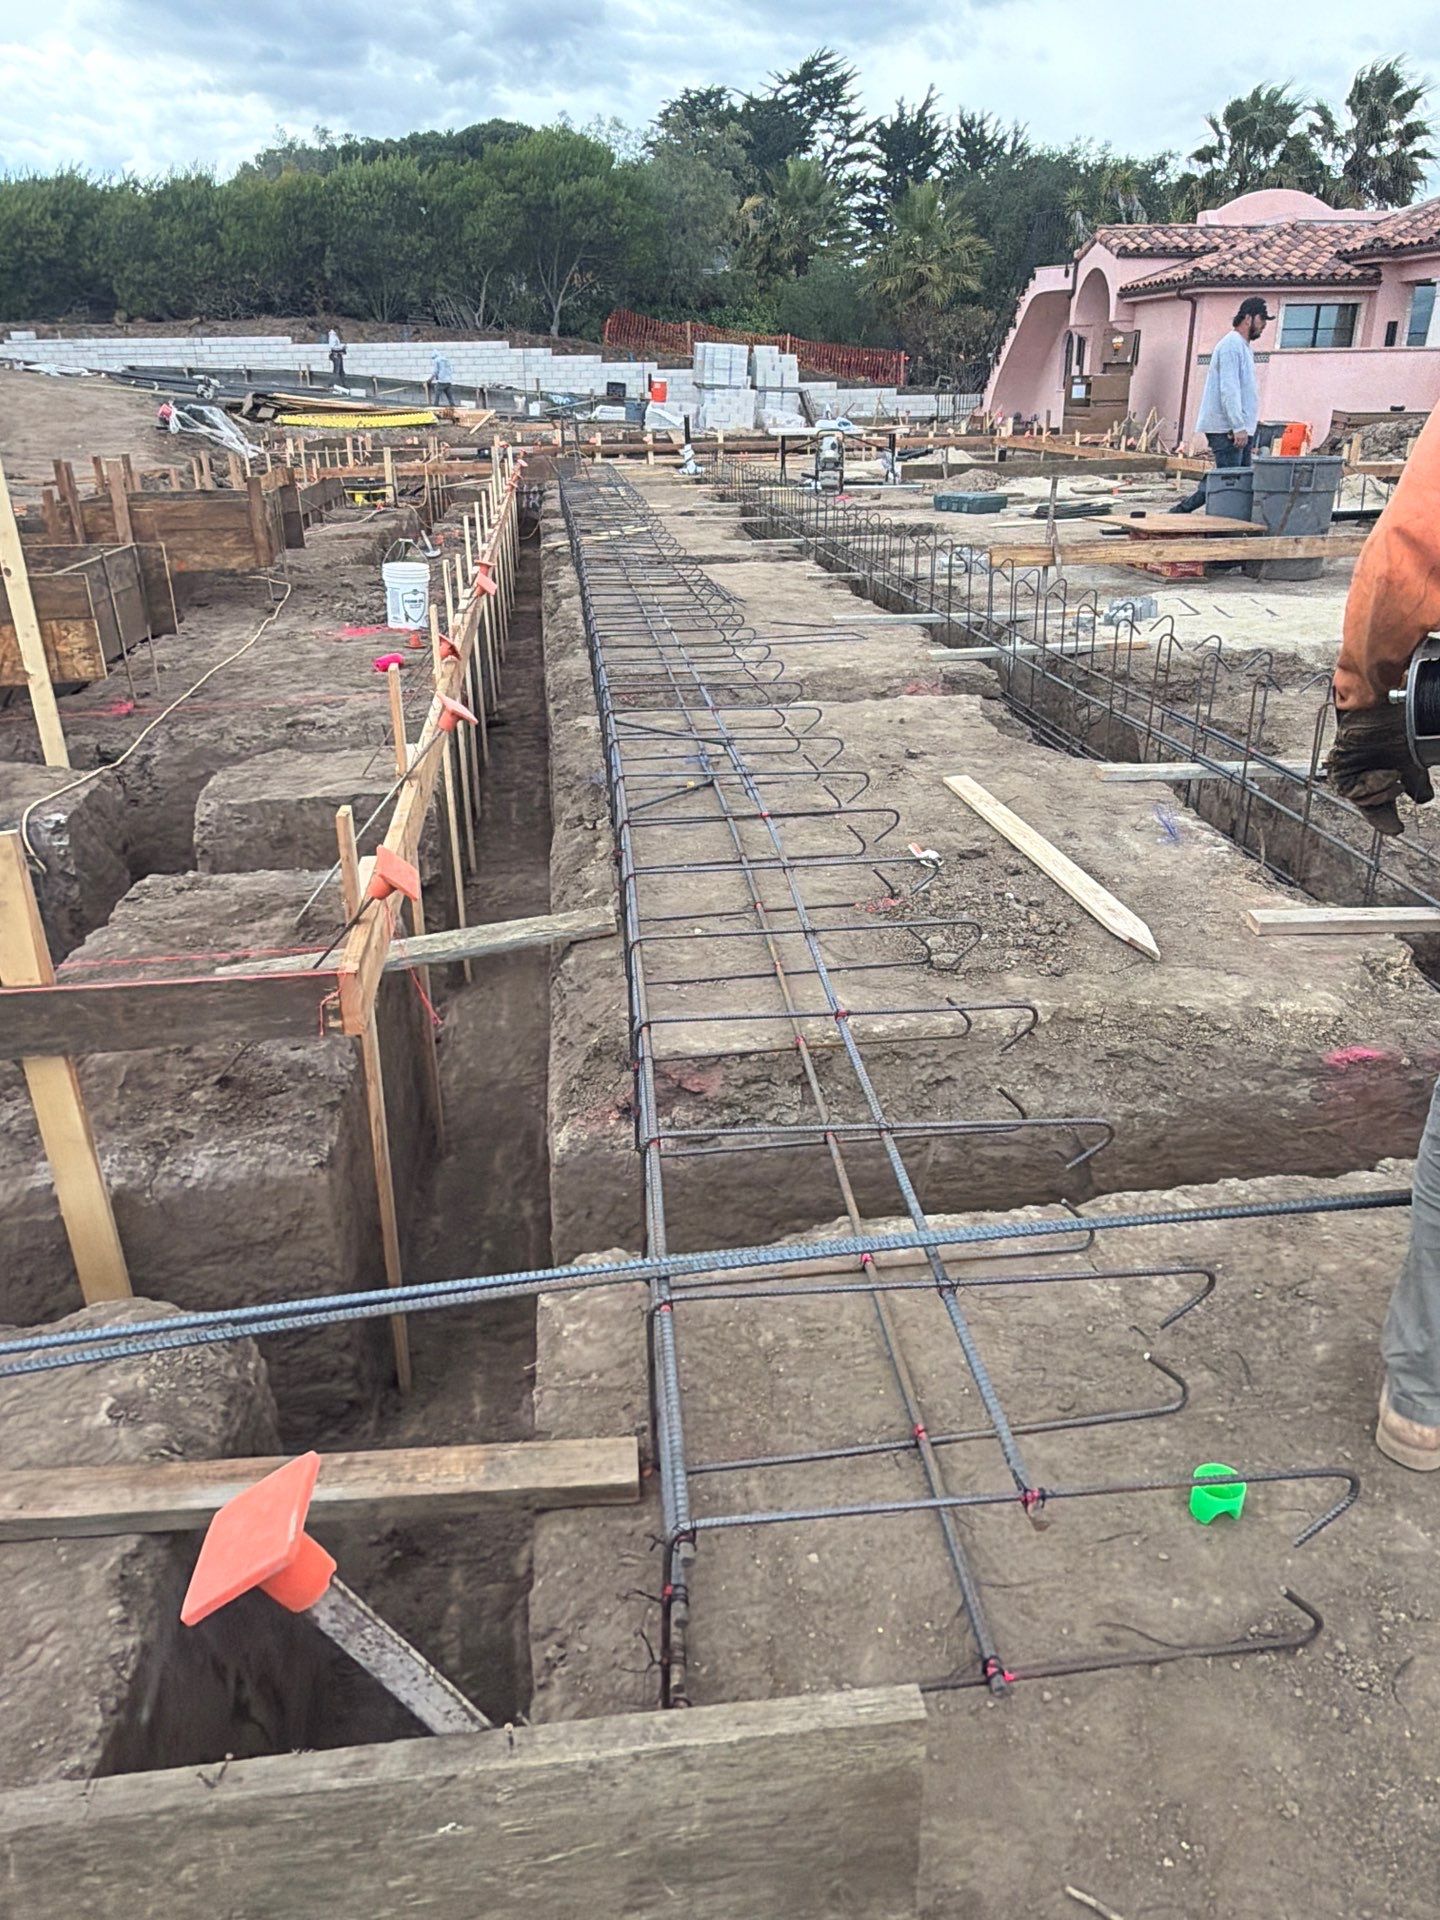
The machine gets us close; hands get us exact. We excavate the footing and grade-beam lines to the engineered depth and width, and those depths vary across the pad - each beam has to sit a set distance below its own finish grade, and the finish grade steps up and down across the house. Once the string lines and outside forms are confirmed, the crew hand-cleans the bottom of every trench with a flat shovel. A clean, undisturbed bottom gives the footing full bearing; a soft spot or a void would let it settle later. Every trench matches its detail.
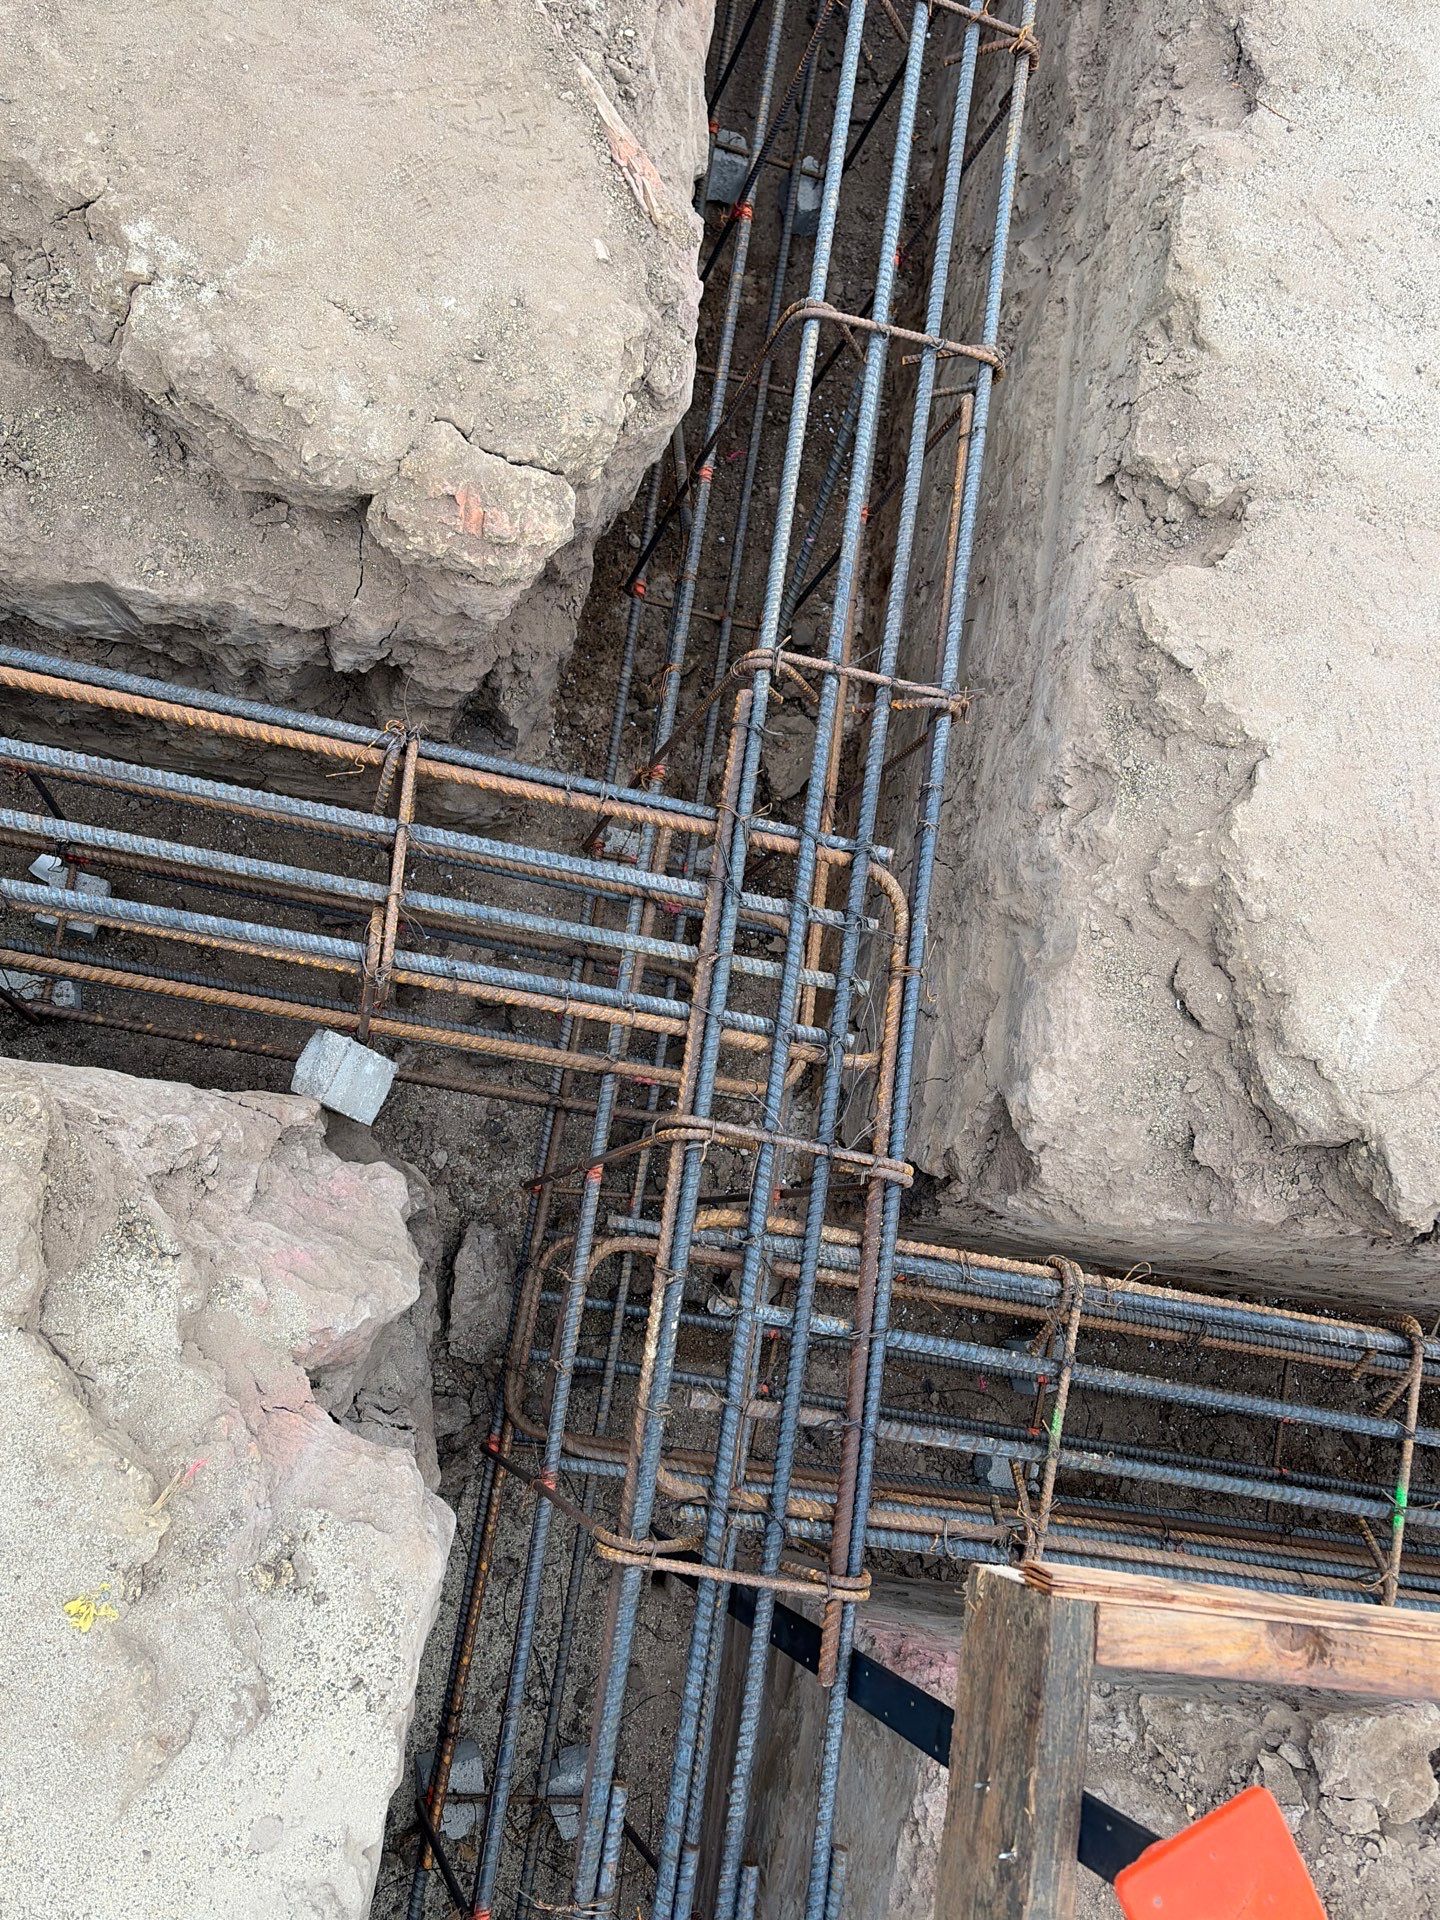
5. The Cage
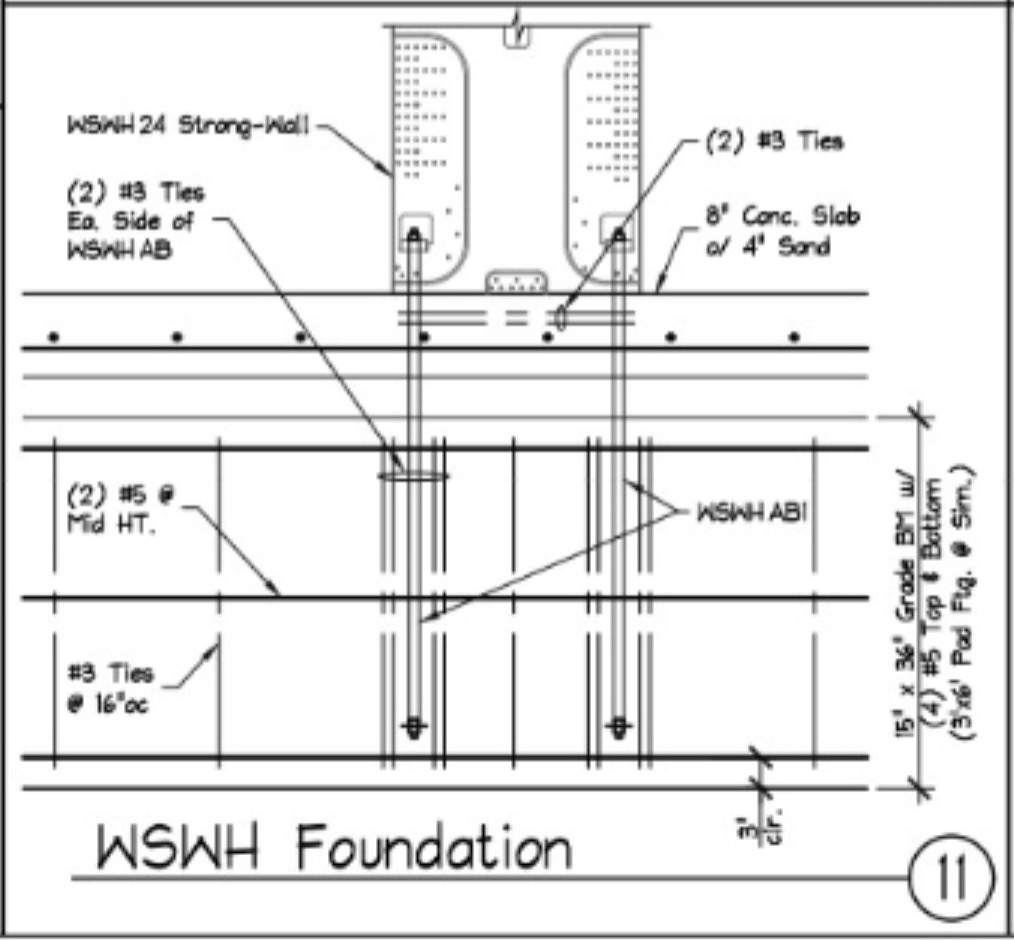
The steel inside each beam is engineered to crack-proof it, and where the steel sits is dictated by where the beam wants to bend. Concrete is strong in compression and weak in tension, so the steel takes the tension. The longitudinal bars that run the length of the beam, along the top and the bottom, are the main flexural steel: the bottom bars handle the sag at mid-span, the top bars handle the lift over the bearing points. Heavier runs carry more longitudinal bars, lighter runs like the garage beams fewer - the count comes off the structural schedule, matched to the load. Wrapping them are the ties - the closed rectangular loops that do three jobs at once: resist shear, hold the cage square during the pour, and confine the core so the beam bends instead of shattering in a quake. How close together the ties sit comes off the detail, not a rule of thumb - the spacing tightens wherever the engineer calls for more.
We build the cage in sections, the way you would lay out a body’s arteries. The bars get set on the ground and the tie spacing painted on, then the bottom half is tied together above the trench, dropped in halfway, and the top half built from there. We run the main arteries first and stop them where an intersection will land, then build the smaller side runs, then make up the joints. At every intersection the bars turn 90 degrees and lap by the length the detail calls for - enough to link the beams into one continuous web - and a bent z-bar tied in periodically holds the whole cage in shape while it is moved. The hold-downs and anchor bolts that tie the framing down get set into this same cage before the pour - their own family of hardware, which we cover in the steel that ties a house to its foundation.
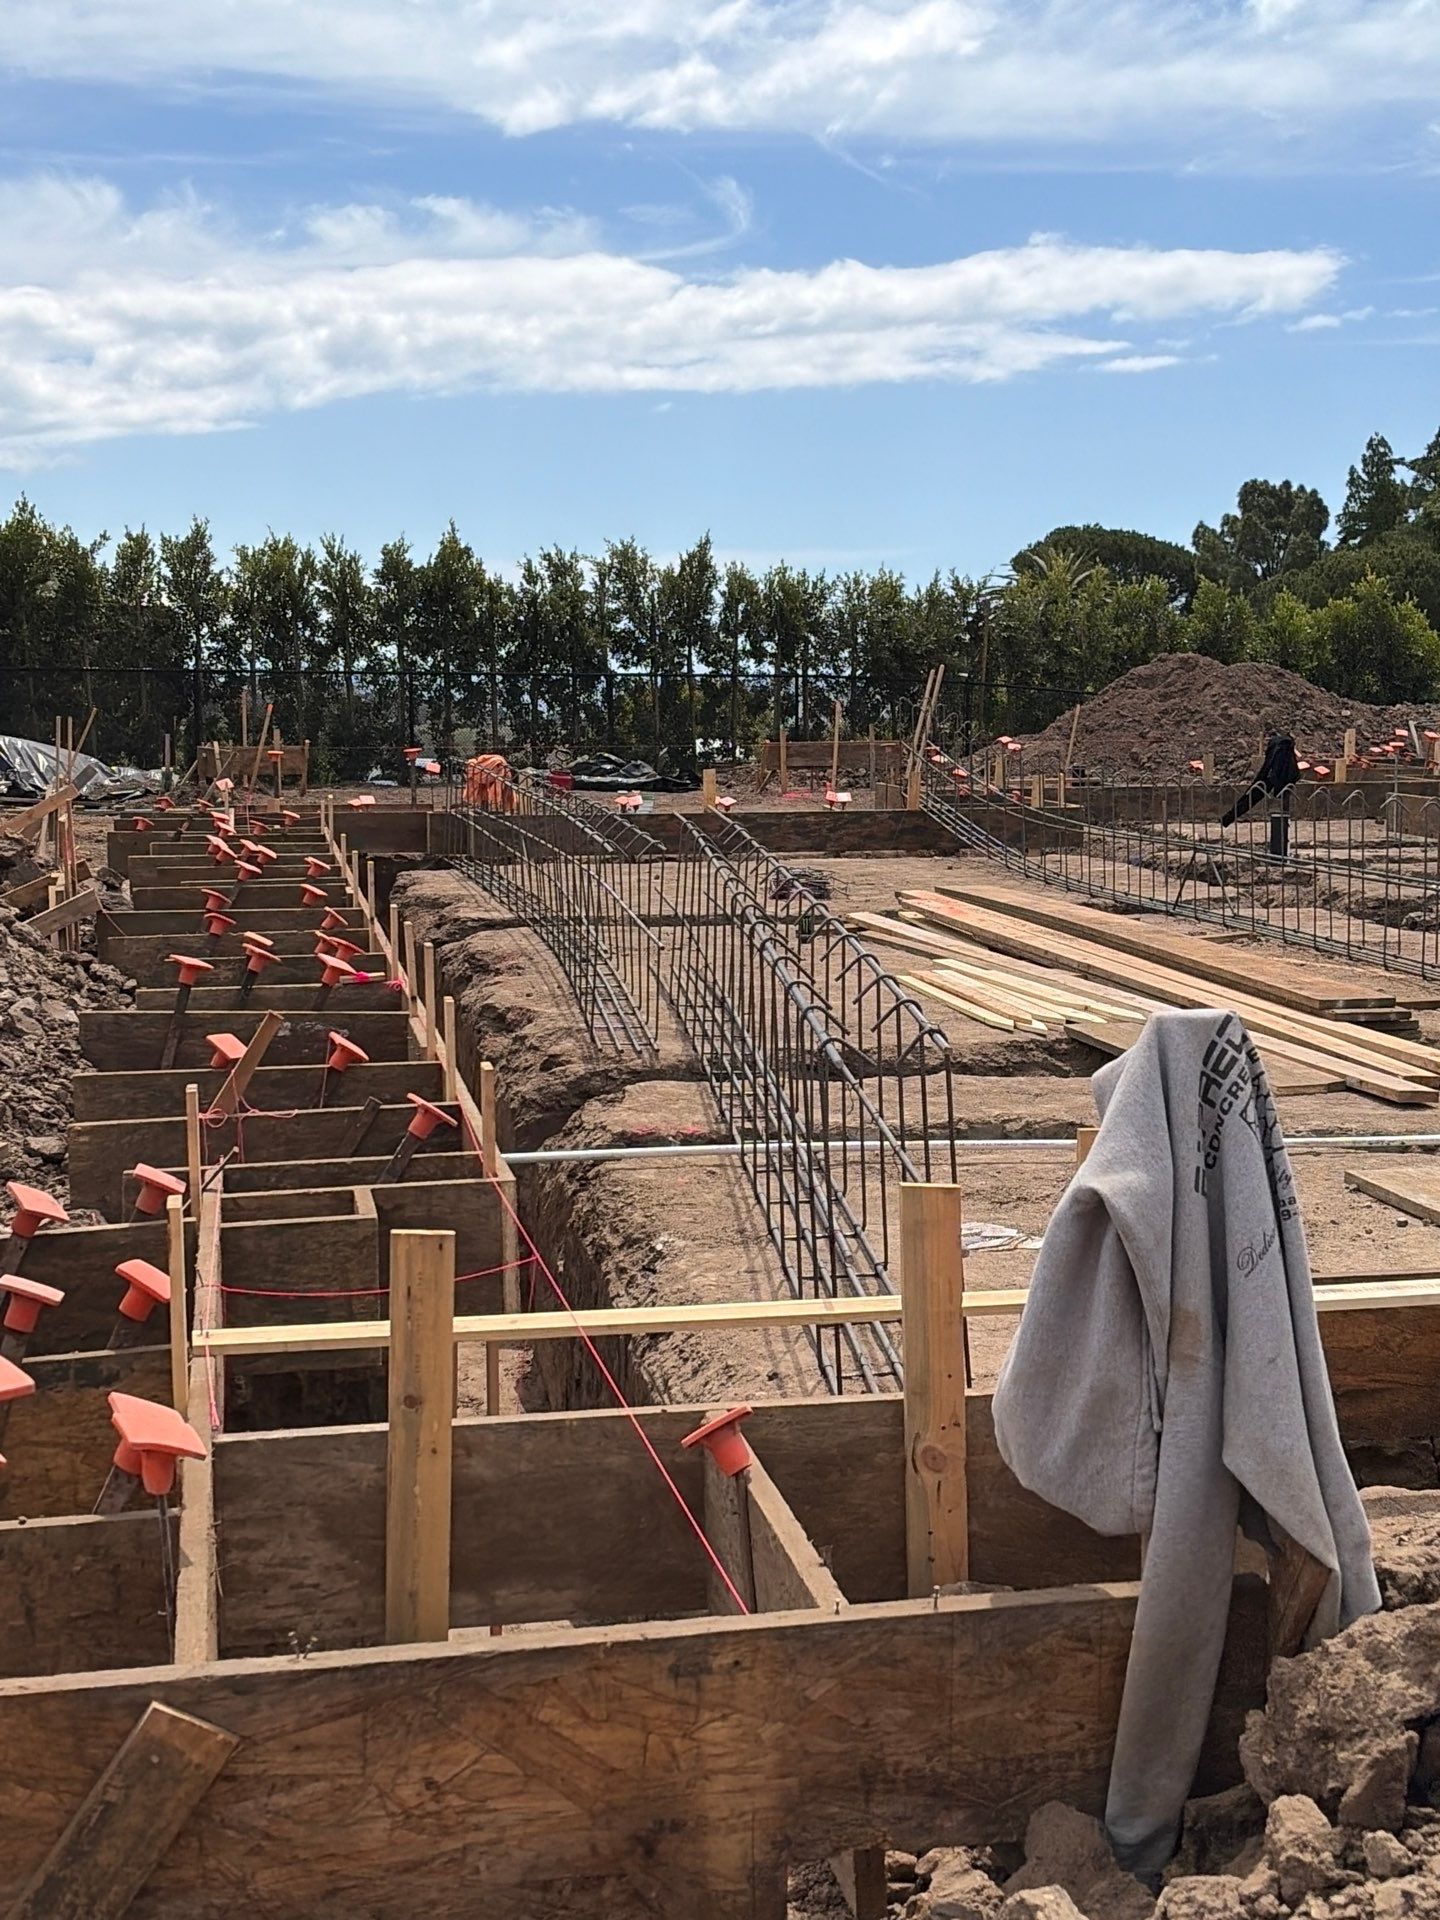
The finished cage rides on small chairs that hold it up off the dirt. Those chairs set the cover - the blanket of concrete between the steel and the outside world. Against bare earth, code wants 3 inches of it, because that cover is what keeps soil and water off the bars so they do not rust and split the concrete from the inside. The heavier the load a beam carries, the more steel goes in it and the deeper its footing drops - the cage always matches the calc. No two runs are reinforced quite the same; the detail sets the bar count, the tie spacing, and the lap length for each one. Get the cage wrong and there is no field fix.
6. The Gate Before Concrete
Nothing gets poured until two people sign off. The soils engineer confirms the bearing soil and the bottom of the footings; the city inspector checks bar size, spacing, cover, laps, and every embedment. Only after both clear it does concrete get scheduled. The inspection is the cheapest insurance on the job.
Key Takeaways
- A monolithic foundation casts footings, grade beams, and slab in one pour - no cold joints, no second chances.
- A footing bears down and spreads load into the soil; a grade beam spans across weak ground; a tie beam holds the footings together.
- Layout comes first - chalk lines, string, and a laser put the plan on the dirt and confirm every width and depth.
- Longitudinal bars top and bottom resist bending; ties handle shear and hold the cage, spaced per the detail; chairs keep 3 inches of cover.
- Cages are built in sections - main runs first, then branches, then the intersections are made up with lapped 90s.
- The soils and city inspections are the gate; once the concrete is in, the steel is set for the life of the house.
The skeleton disappears the day we pour. Every wall, every floor, and every load in the house rides on it for good - which is why we spend weeks getting it right before it vanishes under the slab.